...they want their kitchen back. Yes. This one:
Take note of the lovely overhang for which there is no room for bar stools (which might or might not have been because we have opened our monster table to accommodate 8 people) and the "beautiful" blue/grey/rose laminate which I obviously LOVED when I chose it in 1996. Because you are about to see the kitchen transform before your eyes.
My husband is perpetually on me for hyping things too much then losing the full effect because of expectations. And I probably did it again. *shrug* It's what I do.
In 2013, almost 2 years ago and after painstakingly going through websites and consumer reports and reviews for new kitchen appliances, and after debating if we should just replace as they actually gave out, we bid farewell to our 16 year old white Whirlpool appliances, bit the bullet and bought all new appliances (and the husband a pacemaker because I believe his heart stopped several times during the process). Every so painstakingly slow, we were dragging ourselves into the 21st century. Yes, for us, major purchases like this are a long drawn out soul shattering process and one in which baby steps are necessary. And matters are never helped by having a champagne appetite and a beer budget.
So, fast forward about a year, to around March 2014. The husband received a bonus and we decided to try and finish the project now that we had a timeline: daughter's graduation party in early June. So, we went traipsing through granite show rooms, knowing that we have completely different tastes: his being a more uniform quartz-ish look, mine being a more eclectic but tastefully unusual granite that wouldn't break our meager budget. Choosing granite...worlds colliding...same-sies.
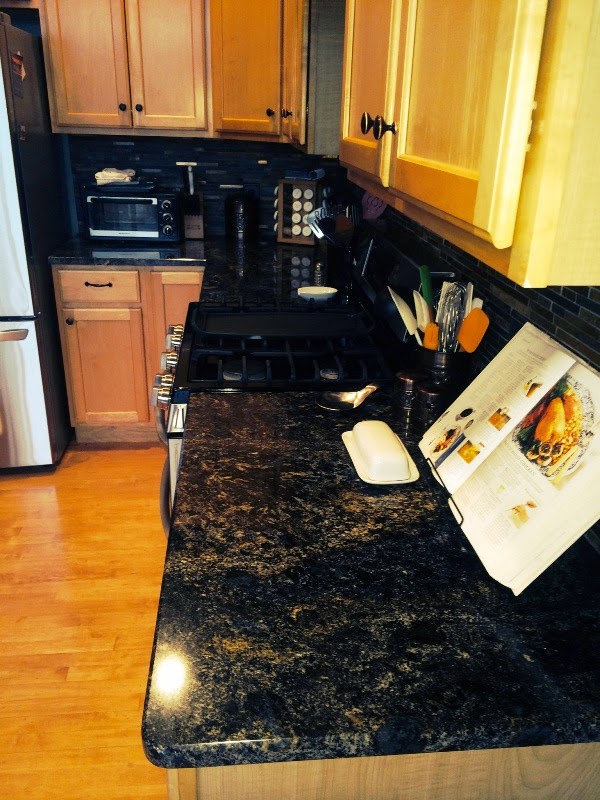
Looking for granite isn't as simple as choosing something online because it has movement and you really have to see the whole piece. I think we hit about 5 warehouses and ended up at the first one, putting a hold on 2 pieces of granite: Cosmic Blue. Now, don't let the name fool you, it's not REALLY blue. It's black background with "cosmic" white, cream, tan, gold and copper movement. And randomly, through the granite, are small white iridescent places where, when the light hits it, it takes on a blue fire. These shots don't really do it justice, mostly because of the lighting, and also because it looks to have green in it. It doesn't.
Now that the granite is chosen we had to find a fabricator to be able to get it in before the party, because, I wouldn't be me if I didn't procrastinate and wait until a month before before starting to look. Luckily, I found someone to do it and with PLENTY of time before the party. Or so I thought.
Yeah, I didn't do a whole lot of real thinking when attempting to get this done while trying to plan a graduation party. My bad. At any rate, it went in with about 10 days to spare. So, you're saying, what's the big deal? The big deal is that we didn't do a granite back splash, as I wanted to tile from the top of the granite to the bottom of the cabinets but we had a laminate back splash up before and when they removed it it left bare walls, void of paint and with plenty of nail holes. 10 days before the party we had progressed to this:
I need to take a moment and talk about that sink. It's a freaking SINK and new faucet and I LOVE LOVE LOVE it. My aforementioned champagne appetite had me looking at something like this (for those of you who are brave enough to click the link and follow through until you find the price...yeah, doing JUST a sink and hood would have financed our kitchen reno 2-3 times) and once I grasped that concept, and dialed'er back about 40 notches, I managed to find a granite composite sink and a beautiful aged bronze faucet on Amazon (Amazon was SO my very best friend during this process but it meant I had to take a leap of faith not being able to see it in person).
Luckily, I had been looking for back splash material, I just couldn't decide until the granite was in. Once in, I hi-tailed it to Home Depot to get a sample and decided yes...this would do. It is random 1 inch pieces of slate* that pulled together the colors in the granite, the warm tone of the maple cabinetry AND the green on my walls that I happen to adore. And as an added bonus there are pieces of copper in the tiles that catch the light.
Which left one small detail remaining...who would install it? Yeah...that's a pretty "small" detail to overlook, given I now had a partially torn apart kitchen (nail holes exposed IS torn apart...in the business vernacular). Luckily I found someone who could have it done by Friday. Party was Saturday. See? SEE what procrastinating does? THIS.
OH, now is probably a good time to add that since the wall I wanted to take down, wasn't in the budget, I decided to move the microwave to its own cabinet (which I didn't have) and replace the cabinet over the stove with a range hood. Good idea right? Now, I have to find a pre-made cabinet that will fit the existing microwave and the space I intend to put it. I started my search in April (thinking I was being oh so proactive and even if I had to do a little refinishing work...no problem...plenty of time right?) and found one in late April on Craigslist. I had her measure the opening to make sure the microwave would fit and lo and behold it would. JUST BARELY. So I went out to purchase, knowing it was white washed and I would need to strip it down and refinish but hey, I had like a month, right?
So, I got the cabinet (which turns out was an old entertainment cabinet) and began the stripping process to remove the whitewash. OMG. Having never done it before, it was WAY more involved than I expected. There were days when I just wanted to say...screw it. Well, except that I now had the stainless steel hood (in a box in my dining room) that the microwave was replacing AND the kitchen cabinet that the microwave hung from was now ensconced in the garage, I was committed. In for a penny, in for a pound. I failed to get a "pre" picture of the unit, but close your eyes and imagine the entire cabinet white washed (yes, even those little decorative touches at the top center and corners of the unit because getting the white out of those crannies had me near to tears). And given that it didn't scrape easily, they obviously white washed it correctly. This was the final product which I know isn't up to professional standards and was intended to look a little "shabby chic". The emphasis there was supposed to be on the chic, but I think the shabby has the starring role. But you know what? I am completely OK with that.

AND while I'm having all these brilliant ideas on how to change my kitchen while not breaking the bank, let's talk about the light over the eat in table. When we had the house built, we stupidly had the light installed centered on the room instead of centered on where the table would be. Of course the table would be centered in the space available in the room, not the actual walls, so we had a hook and extended chain hanging the light where it was more properly centered. (popcorn ceilings meant moving the fixture was more work that we wanted to tackle. And by we I mean me.) BTW, the old light fixture had already been painted once, from its original tacky brass, famous in the 1990s to a hammered pewter.

Perusing kitchen makeover magazines (which is actually a form of self torture, in case you were wondering), I found something I though would work. We have high ceilings and I thought what if we put a small drop in the ceiling where we wanted to put the light so that it would cover the old hole and allow for new placement of a new light? After approaching a friend on how to do this, he made another suggestion that he thought would be easier. Get a simple table, cut off the legs, turn it upside down attach to the joists in the ceiling and recenter where you want it, covering the old hole. Believe it or not, this was actually one of the easiest parts of our renovation. I found a maple butcher block table on craigslist, the husband sanded it down to the grain. I water popped it to take a stain then stained it to match the armoire for the microwave. We had the friend install (which MIGHT have been why it was so easy.) I LOVE...LOVE...LOVE it.

The slate installation was like watching a butterfly emerge from a cocoon; a thing of beauty. The process took longer than I expected mostly because even though those interlocking edges are SUPPOSED to line up and fit easily, they don't. And after hearing the installer swear as the first few tiles went up, I was EVER SO GLAD that we (read *I*) had chosen NOT to inflict this kind of thing on my husband and hired someone to do it. I was seriously scared but as he became more familiar with the pieces, it went faster and with less frustration(at least on my part ;-) ). It is beautiful here but once he came back (after the grout set) and sealed it, OMG...it was stunning:


OK, granite installed, tile installed, cabinet refinished...OH, wait...I forgot about the "issue" we had with the cabinet. Actually, there were two issues. One, there was a decorative corbel that hung down from the corners. When it was measured it was measured from the widest parts, not accounting for the corbel. When we attempted to place the microwave, it wouldn't fit. ARRRRGGGGGGGGG. Yeah, there was a blue cloud of profanity lingering over our house that day. I said words I didn't even know *I* knew. Until...my husband suggested we take off the back panel and insert it from the back. VOILA! Problem one solved. Problem two...that one almost burned down our house. We didn't remove the light from the bottom of the microwave and it was on for a full night after we installed it. We kept smelling something burning and turns out the light was powerful enough to scorch the wood. We removed the light bulb (in the event that the light was ever inadvertently turned on) and slid a large piece of thin aluminum between the two to make sure that there wouldn't be any further contact. The center piece (where the TV would be), I installed cork on the bottom and we use that as a liquor cabinet. The bottom while it looks like drawers is actually two doors and I use to store my food processor, rice maker and assorted small appliances I don't use too often.
The second to last piece to go up was the stainless hood and while it had been delivered (thanks Amazon) before the party, we were renovated out and didn't think about installing it until later (MUCH later...late August to be precise) It was not an easy process and I thank the good Lord that I have a patient and persistent husband who would figure out a way of making it happen come hell or high water. And he did. And it looks...OMG...it looks OUTSTANDING!
The one part of the kitchen that hadn't been completed until December (as you will note in the above picture to the left of the cookbook) was replacing all the outlets and switches with black ones and then replacing the covers with antique bronze with copper accent covers which now makes them fade into the background.
Drum roll please for the finished product:
Words simply cannot express how much I love it. So I won't even try.
*edit-the back splash is slate, not granite


Beautiful!! I know you're enjoying it immensely.
ReplyDelete